Intelligent Parsing + Nginx Reverse Proxy, Self-built CDN Acceleration Node
Publish: 2017-06-28 | Modify: 2017-06-28
Buying a VPS is like "xidu", you can't stop it at all. If you already have a dozen VPSes in your hands and don't know what to do with them, why not study how to build your own CDN together, like "CentOS installation Fikker cache, self-built CDN acceleration". Fikker is very convenient and powerful, but the free version does not support page caching or HTTP/2. We can also use Nginx reverse proxy to implement self-built CDN.

Concept
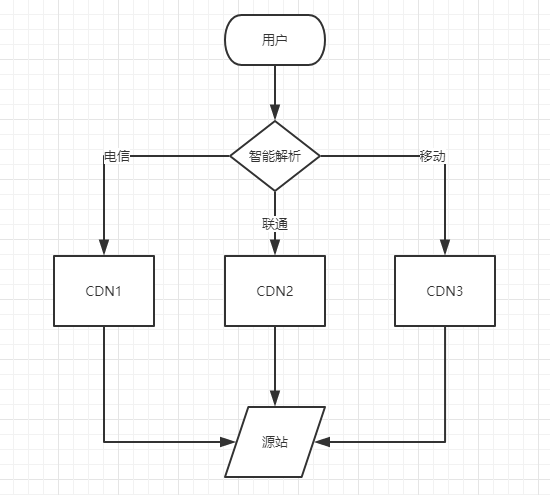
- Intelligent parsing: Domain name intelligent parsing refers to the domain name parsing server making different parsing for the same domain name according to the visitor's IP type. For visitors from China Telecom, the domain name is resolved to the server with China Telecom's IP address. For visitors from China Unicom, the domain name is resolved to the server with China Unicom's IP address. This ensures that visitors are not affected by the bottleneck of China Telecom and China Unicom's network speed.
- Reverse proxy: Reverse proxy is a way to accept connection requests from the Internet through a proxy server, then forward the requests to servers on the internal network, and return the results obtained from the servers to the clients requesting the connection on the Internet. At this time, the proxy server behaves as a reverse proxy server to the outside world.
- CDN: CDN stands for Content Delivery Network, which is a network that distributes content. The basic idea is to avoid bottlenecks and links on the Internet that may affect data transmission speed and stability as much as possible, making content transmission faster and more stable. Its purpose is to enable users to obtain the required content nearby, solve the congestion problem of the Internet, and improve the response speed of users accessing websites.

Preparation
- Intelligent parsing: It is recommended to use CloudXNS or DNSPOD.
- 3 or more VPSes, such as "Wild Grass Cloud Hong Kong VPS".
Install Nginx
Nginx needs to be installed on all CDN server nodes. It is recommended to use OneinStack or Junge's lnmp.org one-click package. If you don't want to use them, you can try Xiaoz's one-click Nginx installation package (for CentOS 7, Deebian 8). Just execute the following commands to install:
wget https://raw.githubusercontent.com/helloxz/nginx-cdn/master/nginx.sh
chmod +x nginx.sh && ./nginx.sh
Reverse Proxy Configuration
You can understand reverse proxy as a CDN node. Here, we use 4 servers as an example:
- Source server: 192.168.1.100, where the website data is actually stored.
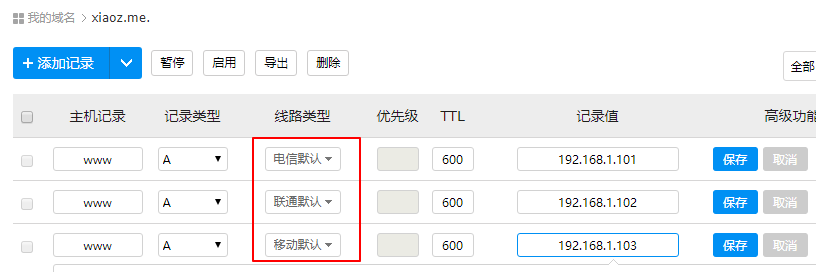
- CDN1: 192.168.1.101 (Telecom node).
- CDN2: 192.168.1.102 (Unicom node).
- CDN3: 192.168.1.103 (Mobile node).
If you want to build a CDN node for www.xiaoz.me and put the data on 192.168.1.100, you need to modify the hosts file to tell the CDN nodes where to get the website data (i.e., the source address). You need to do the following modifications on CDN1/CDN2/CDN3:
vi /etc/hosts
192.168.1.100    www.xiaoz.me
Create the nginx configuration file xiaoz.me.conf under CDN1/CDN2/CDN3:
# Create cache directory
mkdir -p /data/wwwroot/caches/www.xiaoz.me
# Set cache directory permissions
chown -R www:www /data/wwwroot/caches/www.xiaoz.me
# Create xiaoz.me.conf
vi /usr/local/nginx/conf/vhost/xiaoz.me.conf
Add the following content to xiaoz.me.conf. Adjust the cache directory and cache time according to the actual situation. The meanings of each parameter will be explained in detail later.
proxy_cache_path /data/wwwroot/caches/www.xiaoz.me levels=1:2 keys_zone=xiaoz:50m inactive=30m max_size=50m;
server {
    listen 80;
    server_name www.xiaoz.me;
    charset utf-8,gbk;
        location / {
        proxy_set_header Accept-Encoding "";
           proxy_pass https://blog.xiaoz.org;
           proxy_redirect off;
           proxy_set_header X-Real-IP $remote_addr;
           proxy_set_header X-Forwarded-For $proxy_add_x_forwarded_for;
           proxy_cache xiaoz;
           proxy_cache_valid  200 304  30m;
           proxy_cache_valid  301 24h;
           proxy_cache_valid  500 502 503 504 0s;
           proxy_cache_valid any 1s;
           proxy_cache_min_uses 1;
           expires 12h;
    }
}/data/wwwroot/caches/www.xiaoz.me: cache directory.levels: specifies that the cache space has two levels of hash directories, the first level directory is one letter, and the second level directory is two letters.keys_zone=xiaoz:50m: gives the cache space a name, "xiaoz" here, and the following "50m" is the memory cache space.inactive=30m: if the resource is not accessed within 30 minutes, it will be deleted.max_size=50m: specifies the size of the disk cache is 50MB.proxy_cache_valid: specifies the cache time for each status code, write the status code in front and the cache time behind.
Finally, don't forget to reload Nginx to make the configuration take effect. If you are using oneinstack, just enter the command: service nginx reload. If you are using Xiaoz's one-click script, enter: /usr/local/nginx/sbin/nginx -s reload. If there is an error, you can paste the error message for discussion.
Intelligent Parsing
If you have configured the three CDN nodes CDN1/CDN2/CDN3 above, in the CloudXNS background, point different operators to different nodes to achieve distribution and caching acceleration. The screenshot below shows how to do it.

Other Notes
After parsing, you can use the super ping tool ping.chinaz.com to test whether the parsing in different places is effective, or you can modify the hosts file locally to test whether it is normal to access. At the same time, share the complete CDN configuration of Xiaoz's blog (www.xiaoz.me):
proxy_cache_path /data/wwwroot/caches/www.xiaoz.me levels=1:2 keys_zone=xiaoz:50m inactive=30m max_size=50m;
server {
    listen 443 ssl http2;
    ssl_certificate    /data/ssl/www.xiaoz.me/www_xiaoz_me.crt;
    ssl_certificate_key    /data/ssl/www.xiaoz.me/www_xiaoz_me.key;
    ssl_session_timeout 1d;
    ssl_session_cache builtin:1000 shared:SSL:10m;
    ssl_dhparam /data/ssl/dhparam.pem;

    ssl_protocols TLSv1 TLSv1.1 TLSv1.2;
    ssl_ciphers 'ECDHE-ECDSA-CHACHA20-POLY1305:ECDHE-RSA-CHACHA20-POLY1305:ECDHE-ECDSA-AES128-GCM-SHA256:ECDHE-RSA-AES128-GCM-SHA256:ECDHE-ECDSA-AES256-GCM-SHA384:ECDHE-RSA-AES256-GCM-SHA384:DHE-RSA-AES128-GCM-SHA256:DHE-RSA-AES256-GCM-SHA384:ECDHE-ECDSA-AES128-SHA256:ECDHE-RSA-AES128-SHA256:ECDHE-ECDSA-AES128-SHA:ECDHE-RSA-AES256-SHA384:ECDHE-RSA-AES128-SHA:ECDHE-ECDSA-AES256-SHA384:ECDHE-ECDSA-AES256-SHA:ECDHE-RSA-AES256-SHA:DHE-RSA-AES128-SHA256:DHE-RSA-AES128-SHA:DHE-RSA-AES256-SHA256:DHE-RSA-AES256-SHA:ECDHE-ECDSA-DES-CBC3-SHA:ECDHE-RSA-DES-CBC3-SHA:EDH-RSA-DES-CBC3-SHA:AES128-GCM-SHA256:AES256-GCM-SHA384:AES128-SHA256:AES256-SHA256:AES128-SHA:AES256-SHA:DES-CBC3-SHA:!DSS';
    ssl_prefer_server_ciphers on;

    ssl_stapling on;
    ssl_stapling_verify on;

    server_name www.xiaoz.me;
    access_log /data/wwwlogs/xiaoz.me_nginx.log combined;

    charset utf-8,gbk;
        location / {
        proxy_set_header Accept-Encoding "";
           proxy_pass https://blog.xiaoz.org;
           proxy_redirect off;
           proxy_set_header X-Real-IP $remote_addr;
           proxy_set_header X-Forwarded-For $proxy_add_x_forwarded_for;
           proxy_cache xiaoz;
           proxy_cache_valid  200 304  30m;
           proxy_cache_valid  301 24h;
           proxy_cache_valid  500 502 503 504 0s;
           proxy_cache_valid any 1s;
           proxy_cache_min_uses 1;
           expires 12h;
    }
}
server {
    listen 80 default_server;
    return 301 https://$host$request_uri;
}
Summary
The above tutorial requires a little Linux foundation. If you have a lot of idle CDN, you can try it out. If you have any questions, please leave a message for discussion. Please indicate the source when reprinting this article.
Comments

xiaoz
I come from China and I am a freelancer. I specialize in Linux operations, PHP, Golang, and front-end development. I have developed open-source projects such as Zdir, ImgURL, CCAA, and OneNav.
Random article
- Tencent Cloud Hong Kong Lightweight Application Server (Bidirectional CN2 Network), 1 Core 1GB, 24 RMB/month
- An Excellent HTML5 Development Tool: HBuilder
- Enhanced Tool for Windows Console (cmd): cmder
- LNMP 1.2 Causes WordPress Frontend to Fail to Open
- OneNav Bookmark Management Program 0.9.22 Update, Now Supports Online Updates
- ArubaCloud VPS Review, starting from 1€/month
- What to do when the AMH website directory disk is full?
- Gin web framework in Golang does not output log issue
- An Android Client Transdrone Supporting Multiple Download Software such as Aria2/Transmission/qBittorrent
- Improving Windows Uninstall Efficiency: Geek Uninstaller User Experience