How to Install Syncthing on CentOS
Syncthing is an open-source synchronization tool that supports version control and works across multiple clients including Windows, macOS, and Linux. Similar to Resilio, it offers distinct features. This article explains how to install Syncthing on CentOS.

1. Download and Install
Syncthing is easy to configure. Using CentOS x64 as an example, you can download the client from the official Syncthing website. Follow the commands below:
# Download the client
wget http://soft.hixz.org/linux/syncthing-linux-amd64-v0.14.11.tar.gz

# Extract the archive
tar -zxvf syncthing-linux-amd64-v0.14.11.tar.gz

# Enter the directory
cd syncthing-linux-amd64-v0.14.11

# Copy to environment path
cp syncthing /usr/local/bin/
Next, run Syncthing once to generate the initial configuration file. Since it has been added to the environment variables, simply type syncthing to run it. You will see output similar to the following:
[root@xiaoz ~]# syncthing
[monitor] 20:37:05 INFO: Starting syncthing
[start] 20:37:05 INFO: Generating ECDSA key and certificate for syncthing...
[7NYBG] 20:37:05 INFO: syncthing v0.14.11 "Dysprosium Dragonfly" (go1.7.3 linux-amd64) jenkins@build.syncthing.net 2016-11-15 06:23:48 UTC
[7NYBG] 20:37:05 INFO: My ID: 7NYBGD4-AL5FI6M-6P5ULKJ-QSPFASO-T57T4QW-WETWQXT-CAGTJ2I-3PFQGQP
[7NYBG] 20:37:06 INFO: Single thread hash performance is 154 MB/s using minio/sha256-simd (95 MB/s using crypto/sha256).
[7NYBG] 20:37:06 INFO: Default folder created and/or linked to new config
[7NYBG] 20:37:06 INFO: Defaults saved. Edit /root/.config/syncthing/config.xml to taste or use the GUI
[7NYBG] 20:37:06 INFO: Ready to synchronize sxdwy-d7npj (readwrite)
[7NYBG] 20:37:06 INFO: Using discovery server https://discovery-v4-2.syncthing.net/v2/?id=DVU36WY-H3LVZHW-E6LLFRE-YAFN5EL-HILWRYP-OC2M47J-Z4PE62Y-ADIBDQC
[7NYBG] 20:37:06 INFO: Using discovery server https://discovery-v4-3.syncthing.net/v2/?id=VK6HNJ3-VVMM66S-HRVWSCR-IXEHL2H-U4AQ4MW-UCPQBWX-J2L2UBK-NVZRDQZ
[7NYBG] 20:37:06 INFO: Using discovery server https://discovery-v4-4.syncthing.net/v2/?id=LYXCHX-VI3NYZR-ALCJBHF-WMZYSPK-QG6QJA3-MPFYMSO-U56GTUK-NA2MIAW
[7NYBG] 20:37:06 INFO: Using discovery server https://discovery-v6-2.syncthing.net/v2/?id=DVU36WY-H3LVZHW-E6LLFRE-YAFN5EL-HILWRYP-OC2M47J-Z4PE62Y-ADIBDQC
[7NYBG] 20:37:06 INFO: Using discovery server https://discovery-v6-3.syncthing.net/v2/?id=VK6HNJ3-VVMM66S-HRVWSCR-IXEHL2H-U4AQ4MW-UCPQBWX-J2L2UBK-NVZRDQZ
[7NYBG] 20:37:06 INFO: Using discovery server https://discovery-v6-4.syncthing.net/v2/?id=LYXCHX-VI3NYZR-ALCJBHF-WMZYSPK-QG6QJA3-MPFYMSO-U56GTUK-NA2MIAW
[7NYBG] 20:37:06 INFO: TCP listener ([::]:22000) starting
[7NYBG] 20:37:06 INFO: Completed initial scan (rw) of folder sxdwy-d7npj
[7NYBG] 20:37:06 INFO: Loading HTTPS certificate: open /root/.config/syncthing/https-cert.pem: no such file or directory
[7NYBG] 20:37:06 INFO: Creating new HTTPS certificate
[7NYBG] 20:37:07 INFO: GUI and API listening on 127.0.0.1:8384
[7NYBG] 20:37:07 INFO: Access the GUI via the following URL: http://127.0.0.1:8384/
[7NYBG] 20:37:07 INFO: Device 7NYBGD4-AL5FI6M-6P5ULKJ-QSPFASO-T57T4QW-WETWQXT-CAGTJ2I-3PFQGQP is "xiaoz" at [dynamic]
[7NYBG] 20:37:11 INFO: Automatic upgrade (current "v0.14.11" < latest "v0.14.12")
[7NYBG] 20:37:17 INFO: Detected 0 NAT devices
2. Modify Configuration File
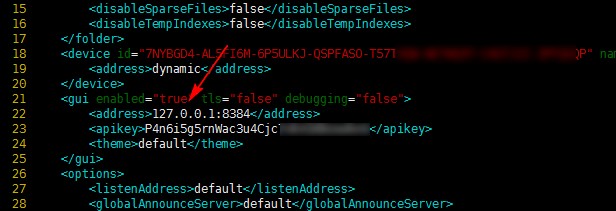
The previous step successfully ran Syncthing and generated the configuration file. Press Ctrl + C to exit the client. You need to modify the default configuration file:
vi ~/.config/syncthing/config.xml
Around line 22, change 127.0.0.1 to 0.0.0.0 as shown in the screenshot below:
3. Open Firewall Ports
Syncthing listens on port 8384 by default. You need to allow this port in iptables by running the following commands:
# Allow port 8384
/sbin/iptables -I INPUT -p tcp --dport 8384 -j ACCEPT

# Save iptables rules
/etc/init.d/iptables save

# Restart iptables service
service iptables restart
4. Test Access
Run the syncthing command again to start the client. Then, open your browser and enter:
http://Your_Server_IP:8384
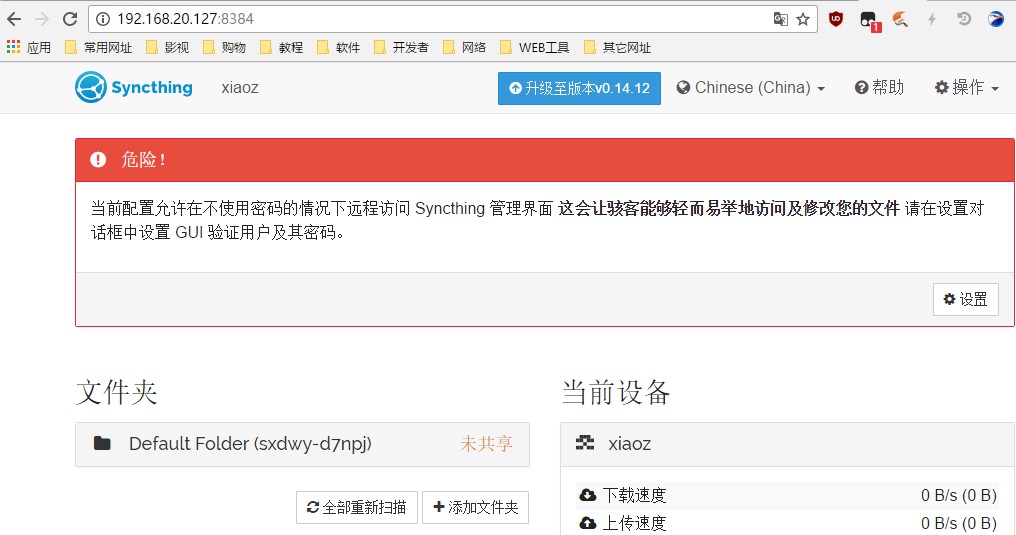
Syncthing supports Chinese by default. Upon first login, you will be prompted to set a username and password. At this point, the installation is complete. You can explore how to add other devices and sync folders on your own.
5. Additional Notes
To run Syncthing in the background, use the nohup command:
nohup syncthing &
6. Summary
Syncthing enables synchronization between different devices, provided the Syncthing client is installed. It also supports version history. If you have the resources, you can use Syncthing to build your own private synchronization tool.
References: