Setting Up a Web Shared Terminal (WebSSH) with ttyd on CentOS 7
ttyd is a simple command-line tool used to share a terminal over the web. Simply put, it allows you to use an SSH terminal service directly in a web browser, and the software is free and open-source.

Install ttyd
The author of ttyd has provided pre-compiled binary files for direct download. The latest version can be downloaded from: https://github.com/tsl0922/ttyd/releases. Here is an example for CentOS 7:
# Download ttyd
wget -O ttyd https://github.com/tsl0922/ttyd/releases/download/1.6.0/ttyd_linux.x86_64
# Add execute permissions
chmod +x ttyd
# Move to directory
mv ttyd /usr/sbin
After completing the steps above, ttyd is installed. You can check the current version by entering the command ttyd -v:
[root@hosta29d0ffef5 ~]# ttyd -v
ttyd version 1.6.0-c15cfb7
Run ttyd
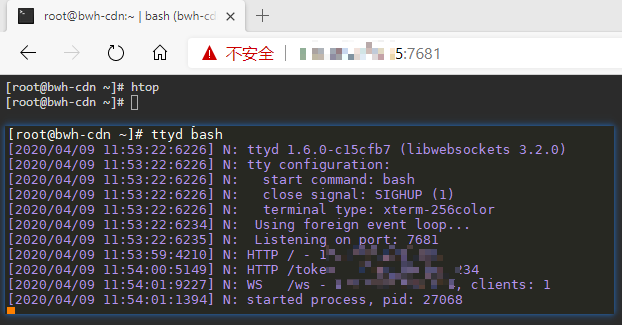
Enter the command ttyd bash to run ttyd. Note that the firewall must allow port 7681, and then you can access http://IP:7681 in your browser to open the web terminal, as shown below.
However, ttyd does not run in the background by default, and accessing port 7681 requires no password verification, which is very insecure. Next, we will create a systemd service for ttyd and set up username and password verification.
Create a Service
Create a ttyd.service file: vi /etc/systemd/system/ttyd.service with the following content:
[Unit]
Description=ttyd
After=network.target

[Service]
ExecStart=/usr/sbin/ttyd -c xiaoz:xiaoz.me bash

[Install]
WantedBy=multi-user.target
After creation, enter the command systemctl daemon-reload to make the daemon effective.
The -c parameter used above sets username and password verification. The format is -c username:password. The username set above is xiaoz and the password is xiaoz.me. Please modify them to your own username and password.
After creating the service, you can manage it using systemd commands:
# Start ttyd
systemctl start ttyd
# Stop ttyd
systemctl stop ttyd
# Restart ttyd
systemctl restart ttyd
# Enable at boot
systemctl enable ttyd
Nginx Reverse Proxy
If you prefer not to access via IP + port, you can set up an Nginx reverse proxy to access via a domain name. The configuration is as follows:
If it is the website root directory
location / {
    proxy_http_version 1.1;
    proxy_set_header Host $host;
    proxy_set_header X-Forwarded-Proto $scheme;
    proxy_set_header X-Forwarded-For $proxy_add_x_forwarded_for;
    proxy_set_header Upgrade $http_upgrade;
    proxy_set_header Connection "upgrade";
    proxy_pass http://127.0.0.1:7681;
}
If it is a website subdirectory
location ~ ^/ttyd(.*)$ {
    proxy_http_version 1.1;
    proxy_set_header Host $host;
    proxy_set_header X-Forwarded-Proto $scheme;
    proxy_set_header X-Forwarded-For $proxy_add_x_forwarded_for;
    proxy_set_header Upgrade $http_upgrade;
    proxy_set_header Connection "upgrade";
    proxy_pass http://127.0.0.1:7681/$1;
}
Note that ttyd in the above configuration can be modified to the path you want.
ttyd Parameter Explanation
Enter ttyd -h to view the ttyd help documentation:
USAGE:
    ttyd [options] <command> [<arguments...>]

VERSION:
    1.6.0

OPTIONS:
    -p, --port              Port to listen (default: 7681, use `0` for random port)
    -i, --interface         Network interface to bind (eg: eth0), or UNIX domain socket path (eg: /var/run/ttyd.sock)
    -c, --credential        Credential for Basic Authentication (format: username:password)
    -u, --uid               User id to run with
    -g, --gid               Group id to run with
    -s, --signal            Signal to send to the command when exit it (default: 1, SIGHUP)
    -a, --url-arg           Allow client to send command line arguments in URL (eg: http://localhost:7681?arg=foo&arg=bar)
    -R, --readonly          Do not allow clients to write to the TTY
    -t, --client-option     Send option to client (format: key=value), repeat to add more options
    -T, --terminal-type     Terminal type to report, default: xterm-256color
    -O, --check-origin      Do not allow websocket connection from different origin
    -m, --max-clients       Maximum clients to support (default: 0, no limit)
    -o, --once              Accept only one client and exit on disconnection
    -B, --browser           Open terminal with the default system browser
    -I, --index             Custom index.html path
    -b, --base-path         Expected base path for requests coming from a reverse proxy (eg: /mounted/here)
    -6, --ipv6              Enable IPv6 support
    -S, --ssl               Enable SSL
    -C, --ssl-cert          SSL certificate file path
    -K, --ssl-key           SSL key file path
    -A, --ssl-ca            SSL CA file path for client certificate verification
    -d, --debug             Set log level (default: 7)
    -v, --version           Print the version and exit
    -h, --help              Print this text and exit

Visit https://github.com/tsl0922/ttyd to get more information and report bugs.
Summary
Using ttyd allows you to quickly set up a WebSSH service, but convenience comes with increased security risks. Although ttyd provides basic password verification, this method is still not secure. Using ttyd means your server has another entry point, so it is not recommended for production environments, but it is fine for personal experimentation.
- ttyd project address: https://github.com/tsl0922/ttyd
- ttyd official homepage: https://tsl0922.github.io/ttyd/