Deploying FRP Service on CentOS 7 for Intranet Penetration
FRP is a high-performance reverse proxy application for intranet penetration, supporting TCP and UDP protocols. It provides additional capabilities for HTTP and HTTPS applications and tentatively supports peer-to-peer penetration.

If you have used services similar to花生壳 (Oray), you may be familiar with FRP. FRP enables public network penetration to the intranet, allowing access even if your intranet machine does not have a public IP. However, services like 花生壳 often limit traffic or require payment and may pose security risks. If you have your own VPS, you can easily set up FRP. This article shares an open-source project from GitHub, using CentOS 7 X64 as an example.
Prerequisites
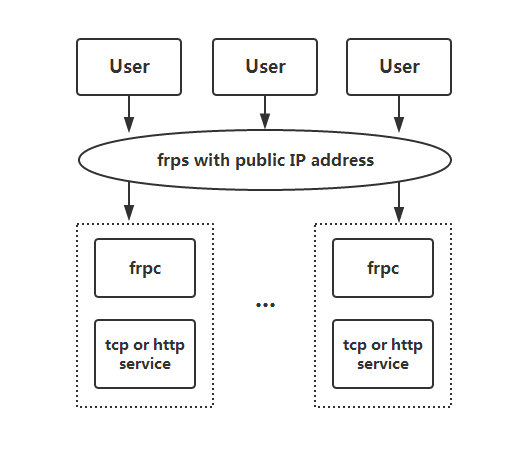
FRP consists of a server and a client. The goal of this article is to penetrate to the intranet to connect to a Windows PC. Before starting, let's look at the FRP architecture diagram.
Install FRP Server
The author has provided compiled binary packages. Download, extract, and then modify the configuration file.
# Download the server
wget https://github.com/fatedier/frp/releases/download/v0.25.0/frp_0.25.0_linux_amd64.tar.gz
# Extract
 tar -zxvf frp_0.25.0_linux_amd64.tar.gz
# Enter the directory
cd frp_0.25.0_linux_amd64
After extraction, you will see several files. For the Server, you only need the following two:
-rwxrwxr-x 1 mysql mysql 11026848 Mar 11 17:15 frps
-rw-rw-r-- 1 mysql mysql       26 Mar 11 17:19 frps.ini
Continue editing the frps.ini file and write the following content:
[common]
bind_port = 7000

[mstsc]
listen_port = 3389
auth_token = 123456
bind_port: The port the main service needs to listen on, here using 7000.listen_port: The port to be forwarded, here using 3389.auth_token: Acts as a verification password, here using 123456, which can also be left empty.
After completing the configuration file, enter the command ./frps -c ./frps.ini to start the server. Don't forget to allow the ports in the firewall. If you need the service to run in the background, replace the command with: nohup ./frps -c ./frps.ini &
# Allow ports via iptables
iptables -A INPUT -p tcp --dport 7000 -j ACCEPT
iptables -A INPUT -p tcp --dport 3389 -j ACCEPT
service iptables save
# Allow ports via firewalld
firewall-cmd --zone=public --add-port=7000/tcp --permanent
firewall-cmd --zone=public --add-port=3389/tcp --permanent
firewall-cmd --reload
Install Windows Client
As mentioned above, FRP consists of a server and a client. The server installation is complete. Next, we install the client on Windows.
- Windows Client Download Link: frp_0.25.0_windows_amd64.zip
After extraction, we need the following two files:
frpc.exe
frpc.ini
Modify the configuration file frpc.ini content as follows:
[common]
server_addr = 1.1.1.1
server_port = 7000

[mstsc]
type = tcp
local_ip = 127.0.0.1
local_port = 3389
remote_port = 3389
auth_token = 123456
server_addr: The server's public IP.server_port: The port the FRP main service listens on.local_ip: The local computer's IP.local_port: The port the local computer listens on (Windows Remote Desktop Service defaults to 3389).remote_port: The port the Server needs to forward.auth_token: Verification password, 123456 set in the previous step.
In the cmd window, enter the FRP client directory and execute the command frpc.exe -c frpc.ini. If no errors occur, the client is running normally. If your server IP is 1.1.1.1, when you connect to 1.1.1.1:3389, it will be mapped to the intranet 127.0.0.1:3389, achieving intranet penetration.
Summary
The above method is suitable for those who cannot apply for a public IP locally. If you already have a public IP locally, you can directly use the port mapping function of your modem or router. The above work only forwards TCP traffic; FRP's uses go far beyond this. If you are interested, you can explore further.
- GitHub Project Address: https://github.com/fatedier/frp
- Latest Server/Client Download: https://github.com/fatedier/frp/releases
- Part of this article references: https://github.com/fatedier/frp/blob/master/README_zh.md