How to Install Fail2ban and Firewalld on CentOS 7 to Prevent Brute Force and CC Attacks
Fail2ban monitors system logs and executes blocking actions based on matched error messages. While most tutorials focus on the fail2ban + iptables combination, CentOS 7 comes with Firewalld built-in, which is simpler and more convenient to use. This guide shares how to use fail2ban with Firewalld.

Check if Firewalld is Enabled
# If you have already installed iptables, it is recommended to stop it first
service iptables stop
# Check Firewalld status
firewall-cmd --state
# Start firewalld
systemctl start firewalld
# Set to start on boot
systemctl enable firewalld.service
After enabling Firewalld, all port connections will be blocked by default. Therefore, you must allow common ports to avoid being locked out. Below is an example of allowing the SSH port (22):
# Allow port 22
firewall-cmd --zone=public --add-port=80/tcp --permanent
# Reload configuration
firewall-cmd --reload
# Check allowed ports
firewall-cmd --zone=public --list-ports
Install Fail2ban
Fail2ban monitors system logs and uses Firewalld to block abnormal IPs based on specific rules, which is particularly effective against brute force attacks and scanning.
# CentOS's built-in repository does not include fail2ban, so you need to install the EPEL repository first
yum -y install epel-release
# Install fail2ban
yum -y install fail2ban
After successful installation, the fail2ban configuration files are located in /etc/fail2ban. The jail.conf file is the main configuration file, and matching rules are located in the filter.d directory. Other directories/files are rarely used; you can search for more details if needed.
Configure Rules
Create a jail.local file to override some default fail2ban rules:
# Create configuration
vi /etc/fail2ban/jail.local
# Default configuration
[DEFAULT]
ignoreip = 127.0.0.1/8
bantime  = 86400
findtime = 600
maxretry = 5
# The banaction must be firewallcmd-ipset, which is key for firewalld support. Do not use this if using iptables.
banaction = firewallcmd-ipset
action = %(action_mwl)s
- ignoreip: IP whitelist. IPs in the whitelist will not be blocked. Multiple IPs can be separated by commas.
- bantime: Blocking duration in seconds.
- findtime: Time window for detection.
- maxretry: Maximum number of allowed attempts.
- banaction: Method used to block the IP. Here, firewalld is used to block ports.
Prevent SSH Brute Force Attacks
If you are still using the default SSH port (22), you may be scanned daily. It is strongly recommended to refer to "Linux Server Login Security" to strengthen server protection, or use fail2ban to block malicious IPs.
Continue modifying the jail.local configuration file and append the following content:
[sshd]
enabled = true
filter  = sshd
port    = 22
action = %(action_mwl)s
logpath = /var/log/secure
- [sshd]: Name, can be anything.
- filter: Rule name, must be a rule located in the
filter.ddirectory.sshdis a built-in fail2ban rule. - port: Corresponding port.
- action: Action to take.
- logpath: Path to the log file to monitor.
At this stage, the rules in jail.local might look like this:
[DEFAULT]
ignoreip = 127.0.0.1/8
bantime  = 86400
findtime = 600
maxretry = 5
banaction = firewallcmd-ipset
action = %(action_mwl)s

[sshd]
enabled = true
filter  = sshd
port    = 22
action = %(action_mwl)s
logpath = /var/log/secure
The above configuration means that if the same IP has more than 5 consecutive errors within 10 minutes, its IP will be banned using Firewalld. Input systemctl start fail2ban to start fail2ban and test the effect.
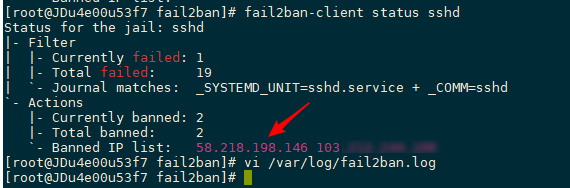
Use another server to continuously attempt SSH connections with incorrect passwords. You will find that after more than 5 consecutive failures, the connection is blocked, indicating the IP has been banned. You can input fail2ban-client status sshd to view the banned IPs, as shown in the screenshot below.
Prevent CC Attacks
Here, we use Nginx as an example. Use fail2ban to monitor Nginx logs, match IPs with frequent requests in a short time, and use firewalld to block them, achieving CC attack protection.
# First, create a new Nginx log matching rule
vi /etc/fail2ban/filter.d/nginx-cc.conf
# Fill in the following content
[Definition]
failregex = <HOST> -.*- .*HTTP/1.* .* .*$
ignoreregex =
Continue modifying vi /etc/fail2ban/jail.local and append the following content:
[nginx-cc]
enabled = true
port = http,https
filter = nginx-cc
action = %(action_mwl)s
maxretry = 20
findtime = 60
bantime = 3600
logpath = /usr/local/nginx/logs/access.log
The above configuration means that if an IP reaches 20 requests within 60 seconds, its IP will be banned for 1 hour. The above is just for testing; please modify according to your actual situation. logpath is the Nginx log path.
Prevent WordPress Brute Force Attacks
If you frequently analyze logs, you will find many robots scanning the WordPress login page wp-login.php. Although they may not succeed, it is better to block their IPs just in case.
# First, create a new Nginx log matching rule
vi /etc/fail2ban/filter.d/wordpress.conf
# Fill in the following content
[Definition]
failregex = ^<HOST> -.* /wp-login.php.* HTTP/1\.."
ignoreregex =
Continue modifying jail.local and append the following content:
[wordpress]
enabled = true
port = http,https
filter = wordpress
action = %(action_mwl)s
maxretry = 20
findtime = 60
bantime = 3600
logpath = /usr/local/nginx/logs/access.log
Of course, don't forget to input systemctl restart fail2ban to restart fail2ban and make it effective.
Common Commands
# Start
systemctl start fail2ban
# Stop
systemctl stop fail2ban
# Start on boot
systemctl enable fail2ban
# View banned IPs, where sshd is the name, e.g., [wordpress] above
fail2ban-client status sshd
# Delete banned IP
fail2ban-client set sshd delignoreip 192.168.111.111
# If the above command fails, try executing
fail2ban-client set sshd unbanip 192.168.111.111
# View logs
tail /var/log/fail2ban.log
Summary
Fail2ban has many built-in matching rules located in the filter.d directory, covering common log matching for SSH, FTP, Nginx, Apache, etc. If these do not meet your needs, you can also create new rules to match abnormal IPs. Using fail2ban + Firewalld to block malicious IPs is an effective method that can greatly improve server security.
Some content in this article is referenced from: CentOS 7 Install Fail2ban to Defend Brute Force Password (with FirewallD)