Using qrsync Command-Line Tool for Linux to Sync Files to Qiniu Cloud Storage
VPS data backup is an important task. In a previous article, Using Qiniu Cloud Storage to Automatically Backup VPS Data, I shared how to use QRSBox provided by Qiniu Cloud Storage to backup data. This article introduces another tool from Qiniu, qrsync. qrsync supports breakpoint-resumed uploads and incremental synchronization. It can synchronize files from a local directory to Qiniu Cloud Storage, handling hundreds of GB or even TB of files without any stress.

1. Download Software
mkdir qrsync              # Create qrsync directory
cd qrsync                 # Enter qrsync directory
wget http://devtools.qiniu.com/qiniu-devtools-linux_amd64-current.tar.gz    # Download qrsync 64-bit version
wget http://devtools.qiniu.com/qiniu-devtools-linux_386-current.tar.gz      # This is for 32-bit, please choose based on your system
tar -zxvf qiniu-devtools-linux_amd64-current.tar.gz                         # Extract the software
2. Create Configuration File
qrsync reads a JSON string as its configuration file. If you have development experience, understanding the JSON configuration below should not be difficult:
vi config.json # Create configuration file
Copy the following content into the config.json file, and modify the parameters as needed. Explanations follow:
{
    "src": "/home/your/sync_dir",
    "dest": "qiniu:access_key=<AccessKey>&secret_key=<SecretKey>&bucket=<Bucket>&...",
    "debug_level": 1
}
- src: The local source directory path. For example,
/home/your/sync_dirin the configuration above is the directory to be uploaded. - AccessKey and SecretKey: After registering a Qiniu Cloud Storage account, you will have a unique AccessKey and SecretKey, which can be viewed in the Personal Panel -> Key Management.
- debug_level: If
debug_levelis set to 1, only necessary logs are obtained; setting it to 0 provides detailed logs.
Below is a JSON configuration snippet from my blog, which uploads all contents in the /home/test folder to the Qiniu space named xzbk:
{
    "src": "/home/test",
    "dest": "qiniu:access_key=<AccessKey>&secret_key=<SecretKey>&bucket=xzbk",
    "debug_level": 1
}
3. Start Upload
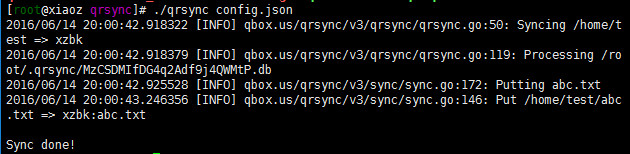
touch /home/test/abc.txt        # Create a test file named abc.txt
./qrsync config.json            # Run qrsync to upload files
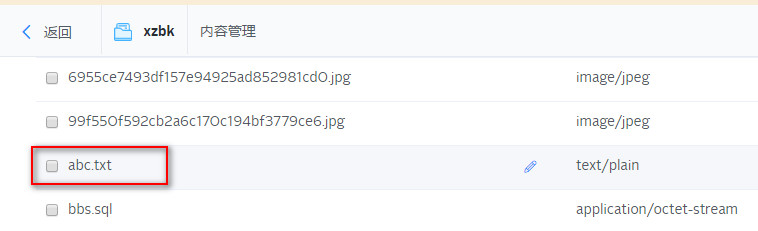
Upon successful upload, you will see the prompt "Sync done!". Then, log in to the Qiniu Cloud Storage backend, find the space named xzbk, and you will see that the abc.txt file has been successfully uploaded.
4. Summary
Users who have completed real-name authentication with Qiniu enjoy 10GB of free storage space and 10GB of free traffic. By participating in the Qiniu Cloud Storage Youth Startup Plan, you can also get a free 1,000 RMB coupon. Using the qrsync tool to backup VPS data is an excellent choice, and the upload and download speeds of Qiniu Cloud Storage are very satisfactory. I recommend you give it a try.
This article only covers the usage of the Linux client. qrsync also supports the Windows client. For more details and support, please refer to the official documentation: qrsync Command-Line Upload and Synchronization Tool.
Recommended Reading: