How to Upgrade CentOS 6/7 Kernel and Enable Google BBR Manually
Google BBR is a TCP acceleration tool that requires a Linux kernel greater than version 4.9. I previously shared an article on one-click kernel upgrade and BBR enablement for CentOS. Although convenient, this method failed on Raksmart, so I attempted a manual kernel upgrade.

CentOS 7 Upgrade Latest Kernel
# Import ELRepo public key
wget https://www.elrepo.org/RPM-GPG-KEY-elrepo.org
rpm --import RPM-GPG-KEY-elrepo.org
# Install ELRepo
rpm -Uvh http://www.elrepo.org/elrepo-release-7.0-3.el7.elrepo.noarch.rpm
# Upgrade to the latest kernel
yum --enablerepo=elrepo-kernel install kernel-ml -y
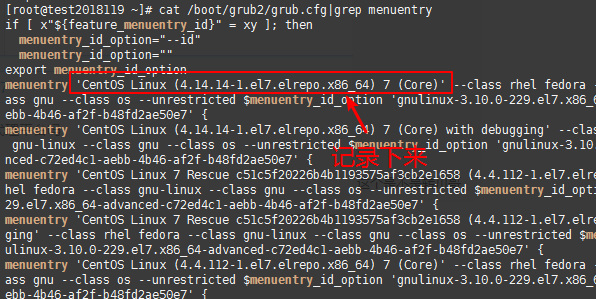
After the kernel upgrade, both the old and new kernels will coexist. CentOS 7 uses the GRUB2 bootloader, so you need to set the priority of the latest kernel to the highest. First, run the command cat /boot/grub2/grub.cfg | grep menuentry to find all kernels, identify the full name of the latest kernel, and record it, as shown in the screenshot below.
# Set the latest kernel (enter the full name found above)
grub2-set-default "CentOS Linux (4.14.14-1.el7.elrepo.x86_64) 7 (Core)"
# After setting, run the following command to verify success
grub2-editenv list
[root@test2018119 ~]# grub2-editenv list
saved_entry=CentOS Linux (4.14.14-1.el7.elrepo.x86_64) 7 (Core)
# OK, reboot the server to apply changes
reboot
CentOS 6 Upgrade Latest Kernel
# Import ELRepo public key
wget https://www.elrepo.org/RPM-GPG-KEY-elrepo.org
rpm --import RPM-GPG-KEY-elrepo.org
# Install ELRepo
rpm -Uvh http://www.elrepo.org/elrepo-release-6-8.el6.elrepo.noarch.rpm
# Upgrade to the latest kernel
yum --enablerepo=elrepo-kernel install kernel-ml -y
After the upgrade, modify /etc/grub.conf to change default=0 to default=1, then run reboot to restart the server.
Check if Kernel Upgrade Was Successful
Run uname -r to check the current kernel version. If it is greater than 4.9, the upgrade was successful. If your network becomes unreachable after the operation, the upgrade may have failed. In this case, you must access the VNC console and revert to the old kernel using the method described above.
# Kernel version greater than 4.9
[root@test2018119 ~]# uname -r
4.14.14-1.el7.elrepo.x86_64
Enable BBR
Simply copy and run the following commands:
# Modify configuration
cat >>/etc/sysctl.conf << EOF
net.core.default_qdisc=fq
net.ipv4.tcp_congestion_control=bbr
EOF
# Apply the configuration
sysctl -p
Run the following commands to verify. If the output includes bbr, the setup was successful, as shown in the screenshot below.
[root@test2018119 ~]# sysctl net.ipv4.tcp_available_congestion_control
net.ipv4.tcp_available_congestion_control = bbr cubic reno
[root@test2018119 ~]# lsmod | grep bbr
tcp_bbr                20480  0
Summary
It is recommended to use the one-click script by QiuShuiYiBing to upgrade the kernel and enable Google BBR: CentOS One-Click Kernel Upgrade and BBR Enablement. If that fails, try the manual upgrade method described above. This method applies to KVM/XEN virtualization. Do not operate on OpenVZ virtualized VPS, as it generally will not succeed. It is also not recommended to perform this on production environments to avoid potential issues.
This article references: ELRepo : HomePage CentOS6.X Kernel Upgrade CentOS 7 Modify Kernel Boot Order