Configuring WP Super Cache with Qiniu Cloud for CDN Acceleration
WP Super Cache is an excellent WordPress caching plugin. In a previous article titled "Excellent WordPress Caching Plugin: WP Super Cache," I provided a brief introduction and configuration guide. Friends who need it can refer to that article first. So, how do you use it for CDN acceleration?
For a long time, I used both WP Super Cache and the WPJAM Qiniu Image Storage plugin simultaneously, and the effect was quite obvious, especially for friends with servers located abroad. Later, I discovered that you only need WP Super Cache to use Qiniu's CDN acceleration service without installing any other plugins.
1. Install the Plugin
You can complete the installation by searching for WP Super Cache in the backend. If you cannot install it online through the backend, I also provide a download link for the plugin package. Click here to download wp-super-cache.1.4.2.zip.
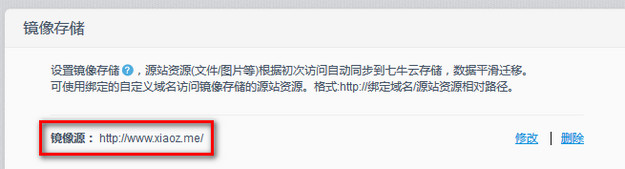
2. Set the Image Source
Regarding Qiniu Cloud registration and bucket (space) creation, I will not elaborate further. Simply accelerate your website in the Qiniu space settings. If you do not know how to register for Qiniu or create a new space, please refer to this article: WordPress Free Image Hosting with Qiniu Cloud Storage.
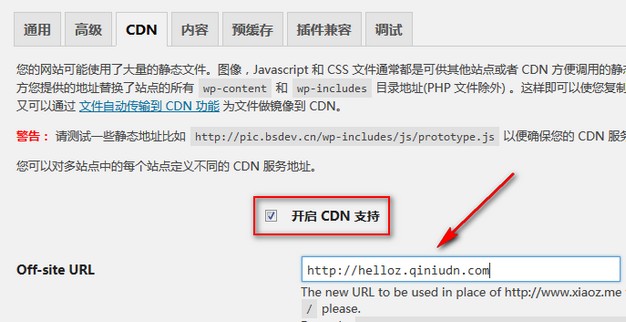
3. Enable CDN Acceleration
In the backend, go to Settings > WP Super Cache > CDN. Check the option to enable CDN and enter the domain name of the space bound to your Qiniu account. Note that the domain name should not end with a "/" as shown in the image below:
After ensuring the settings are correct, you will see that the static resources of your website (images, CSS, JS, etc.) have been replaced with Qiniu addresses, indicating success. Additionally, to avoid your website being penalized by search engines, there are other tasks to complete. Please refer to the article: Correctly Handle Qiniu Cloud Mirror Acceleration to Avoid Website Penalties.