Convert Website Images to WebP Without Changing URLs Using WebP Server
WebP Server is a server based on Golang that allows you to dynamically serve WebP images. It automatically converts images such as JPEG, PNG, BMP, and GIF to WebP format without changing the image URL paths, thereby reducing image size, lowering traffic consumption, and improving loading speed.
What is WebP?
WebP is an image file format that provides both lossy and lossless (reversible) compression, launched by Google. The compression rate of the WebP format is very high; under the same quality, .webp images are significantly smaller in size. Mainstream browsers like Firefox and Chrome already support WebP images, but Safari does not support them yet.
The Role of WebP Server
WebP Server acts as a sidecar web server. After the administrator configures WebP Server, it can automatically convert images such as JPEG, PNG, BMP, and GIF to WebP format. The URL address remains unchanged. For browsers that support WebP images like Firefox and Chrome, it returns the WebP format directly to the user. For browsers that do not support WebP, such as Safari, it outputs the original image, ensuring a seamless user experience.
Configuring WebP Server
This article uses a WordPress site as an example for practical operation. The environment is as follows:
- Operating System: CentOS 7
- Site Program: WordPress
- Current Web Server: Nginx
Download WebP Server
The author has provided compiled binary versions. You can download them from: https://github.com/webp-sh/webp_server_go/releases. The commands below may not be the latest version over time.
# Download WebP Server
wget -O webp-server https://github.com/webp-sh/webp_server_go/releases/download/0.1.2/webp-server-linux-amd64
# Add execution permissions
chmod +x webp-server
Create a systemd Service
To keep WebP Server running in the background, it is more convenient to manage it using a systemd service. For reference on systemd practices, see my previous article Linux System Writing Systemd Service Practice. However, WebP Server provides the systemd file for us, so we can use it directly.
Execute the following command to generate the systemd service file:
./webp-server -dump-systemd
The content of the generated service file is as follows:
[Unit]
Description=WebP Server Go
Documentation=https://github.com/webp-sh/webp_server_go
After=nginx.target

[Service]
Type=simple
StandardError=journal
WorkingDirectory=/opt/webps
ExecStart=/opt/webps/webp-server --config /opt/webps/config.json
Restart=always
RestartSec=3s

[Install]
WantedBy=multi-user.target
This service file reads directly from the /opt/webps/ directory. Therefore, we need to create this directory first and move webp-server into it:
# Create directory
mkdir -p /opt/webps/
# Move webp-server to the corresponding directory
mv webp-server /opt/webps/
Create Configuration File
Create a new /opt/webps/config.json as the WebP Server configuration file:
# Create file
vi /opt/webps/config.json
The content is as follows:
{
        "HOST": "127.0.0.1",
        "PORT": "3333",
        "QUALITY": "80",
        "IMG_PATH": "/data/wwwroot/xiaoz.me",
        "EXHAUST_PATH": "/data/caches/xiaoz.me",
        "ALLOWED_TYPES": ["jpg","png","jpeg","bmp"]
}
The meaning of each parameter is as follows; please modify according to your actual situation:
- HOST: Listening IP
- PORT: Listening port
- QUALITY: Optimization level, default is 80
- IMG_PATH: Path where site images are stored, usually the site root directory
- EXHAUST_PATH: Cache path; this directory needs to be created manually
- ALLOWED_TYPES: Which image suffixes need to be converted to
webp
Run WebP Server
After the above configuration is complete, enter the following command to run WebP Server:
# Refresh service
systemctl daemon-reload
# Start WebP Server
systemctl start webp-server
# Enable boot startup
systemctl enable webp-server
Nginx Reverse Proxy
In your site configuration file, add the following reverse proxy configuration and restart Nginx to take effect.
location ^~ /wp-content/uploads/ {
    proxy_set_header Host $http_host;
    proxy_pass http://127.0.0.1:3333;
}
Comparison Verification
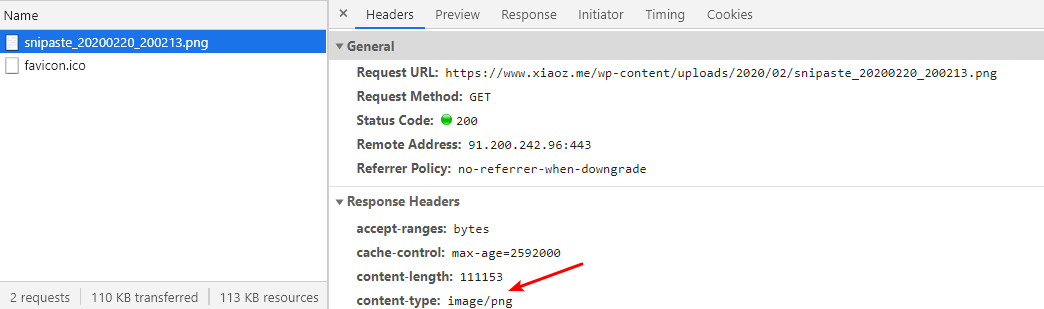
Open https://blog.xiaoz.org/wp-content/uploads/2020/02/snipaste_20200220_200213.png in a browser to see that the image size is 109Kb and the image MIME type is image/png.

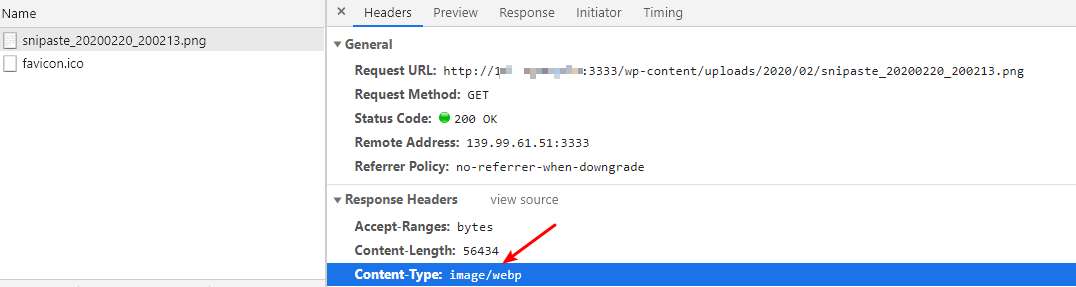
Then access the WebP Server address for comparison. You can see that the image has been compressed to 55.3Kb, and the MIME type has changed to image/webp. The compression effect is very obvious.

Other Compression Tools
For students interested in image compression, you can also refer to my previous articles:
- Automatically Batch Compress Images Using Shell Scripts in Linux Environment
- Compress Images Using Mozilla JPEG on CentOS
- Multiple Image Compression Solutions on CentOS System
Summary
WebP Server can output WebP images or original images based on the visitor's browser without changing the image URL path, which is very convenient. However, if the website enables CDN, the CDN edge nodes will cache the optimized WebP images. If a visitor uses a browser that does not support WebP images, such as Safari, the images may not display. Therefore, WebP Server is not very suitable for CDN scenarios unless you are willing to give up Safari users.
In addition, Upyun CDN also supports adaptive WebP images. Solving the pain point of WebP Server's inability to use CDN from the CDN aspect is a viable solution.
- WebP Server Project Address: https://github.com/webp-sh/webp_server_go
- WebP Server Help Documentation: https://webp.sh/docs/