How to Install BitTorrent Sync on CentOS for Self-Hosted File Sync
BitTorrent Sync, also known as BitSync, is a powerful synchronization tool that supports multiple devices including Windows, Linux, and mobile platforms. With many domestic cloud storage services shutting down, setting up your own sync tool using BitSync is an excellent solution.
1. Download the Software
This guide uses a CentOS 64-bit system as an example. The official BitTorrent Sync website is www.getsync.com, where you can find any version you need. Execute the following commands one by one (comments after ### are for reference only and should not be copied):
mkdir /home/bitsync                    # Create directory
cd /home/bitsync                       # Enter bitsync directory
wget https://download-cdn.getsync.com/stable/linux-x64/BitTorrent-Sync_x64.tar.gz   # Download software (for 32-bit systems, find the 32-bit version on the official site)
tar -zxvf BitTorrent-Sync_x64.tar.gz   # Extract the software
2. Install the Software
After downloading and extracting the software, proceed with the installation:
cd /home/bitsync # Enter bitsync directory
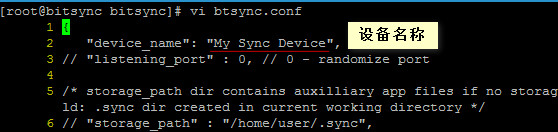
./btsync --dump-sample-config > btsync.conf # Initialize configuration file
vi btsync.conf # Edit configuration file
When editing the configuration file, pay special attention to the following sections:
- Device Name: Modify the device name on the second line as needed.
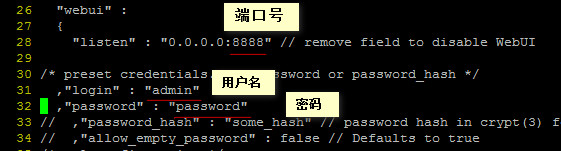
- Port Number: The default port is 8888. Modify it if necessary and ensure the port is allowed in iptables.
- Username and Password: Remove the double slashes (
//) before the username and password fields, then set your desired credentials and save the file.
3. Run the Software
If the server has a firewall (iptables) enabled, you need to allow port 8888 before running the software. Execute the following commands:
/sbin/iptables -I INPUT -p tcp --dport 8888 -j ACCEPT    # Allow port 8888
/etc/init.d/iptables save                                # Save changes
service iptables restart                                 # Restart iptables
./btsync --config btsync.conf                            # Run BitTorrent Sync
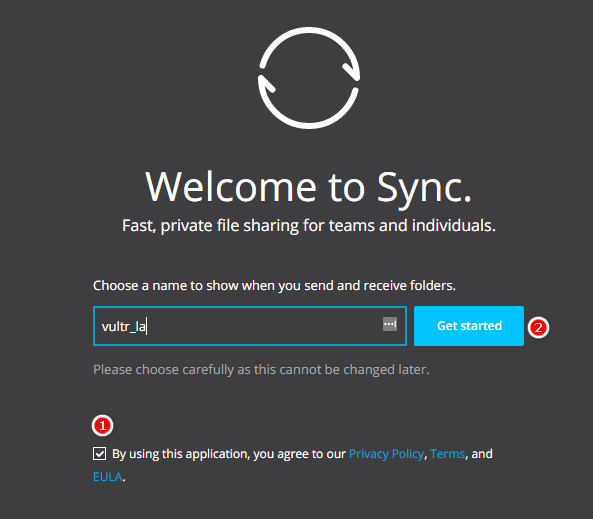
To access the BitTorrent Sync management interface, enter http://Your_IP_or_Domain:8888 in your browser and log in with the username and password you configured. On first login, you will be prompted to enter your name and agree to the terms to access the dashboard.

4. Summary
Once installation and configuration are complete, you can set up specific directories for synchronization. You can install the client on your Windows devices or mobile devices to easily achieve synchronization. Although the Linux GUI is in English, it is very straightforward. If you find it difficult to operate, you can download the Windows client for comparison.
Note: BitTorrent Sync has been renamed to Resilio Sync. For more information, refer to: One-Click Resilio Sync Installation Script for CentOS.