How to Set IPv4 Priority on Windows 10 and 11
When a local network supports both IPv4 and IPv6, accessing IPv6 websites can be very slow, especially for foreign sites. We can try to increase the priority of IPv4. This way, when the target website supports both IPv4 and IPv6, it will default to using IPv4 for access, thereby solving the problem of slow IPv6 network speeds.
Set IPv4 Priority
Open the Start menu, select Run, type cmd, and run it as an administrator. Then enter the following command to check the priority:
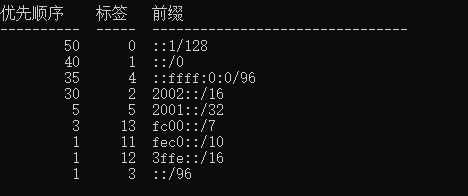
netsh interface ipv6 show prefixpolicies
This command displays the access priority list for network prefixes. The "Priority" column indicates the priority level; a higher value means higher priority and will be accessed first. We can see that the priority of IPv6 (::/0) is higher than that of IPv4 (::ffff:0:0/96), which is why IPv6 is accessed by default.
Continue by entering the following command to increase the IPv4 priority:
netsh interface ipv6 set prefixpolicy ::ffff:0:0/96 100 4
After this setting, IPv4 will be prioritized over IPv6 for access.
Conclusion
By following the method above, you can easily adjust the IPv4 priority to alleviate issues such as poor speed when accessing foreign IPv6 websites.
Some content in this article is referenced from: https://dashen.wang/910.html
The Microsoft Community also provides a non-command line method: How to set IPv4 priority under dual IPv6/IPv4 on Windows 11