How to Build a Beautiful Documentation System with Docsify
Docsify is a dynamic tool for generating documentation websites. Unlike GitBook or Hexo, it does not convert .md files into .html files; all conversion happens at runtime.
Docsify is extremely simple to use and requires no additional scripting. You only need to create an index.html file and include the relevant .js files to start writing documentation.
Features
- No build required; publish directly after writing documentation
- Easy to use and lightweight (~19kB gzipped)
- Intelligent full-text search
- Multiple themes available
- Rich API
- Emoji support
- Compatible with IE10+
- SSR support
Quick Initialization
Before starting, ensure you have a basic understanding of HTML/JavaScript/CSS to avoid confusion if errors occur. Next, create an index.html file in your web directory and copy the following content:
<!DOCTYPE html>
<html>
<head>
  <meta http-equiv="X-UA-Compatible" content="IE=edge,chrome=1">
  <meta name="viewport" content="width=device-width,initial-scale=1">
  <meta charset="UTF-8">
  <link rel="stylesheet" href="//unpkg.com/docsify/themes/vue.css">
</head>
<body>
  <div id="app"></div>
  <script>
    window.$docsify = {
      //...
    }
  </script>
  <script src="//unpkg.com/docsify/lib/docsify.min.js"></script>
</body>
</html>
The configuration above will automatically read the README.md file (note the case sensitivity) in the web directory for rendering.
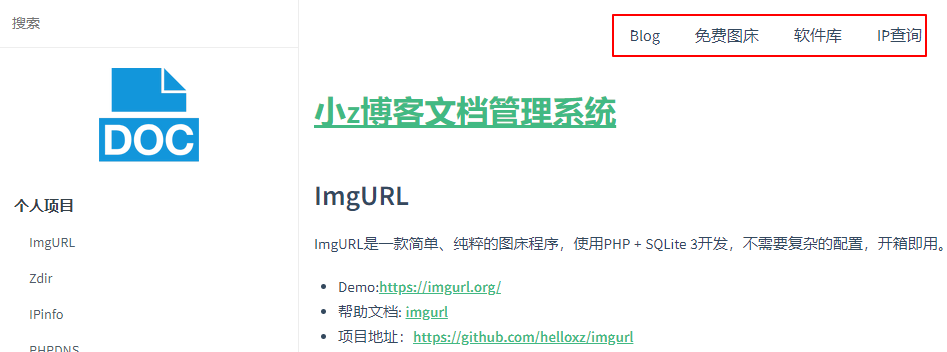
Setting Up the Navigation Bar
Add the relevant content directly within the body tag. For example:
<!-- Navigation Bar -->
<nav>
    <a href="https://blog.xiaoz.org/" rel = "nofollow" target = "_blank" title = "XiaoZ Blog">Blog</a>
    <a href="https://imgurl.org/" rel = "nofollow" target = "_blank" title = "ImgURL">Free Image Hosting</a>
    <a href="http://soft.xiaoz.org/" rel = "nofollow" target = "_blank" title = "XiaoZ Software Library">Software Library</a>
    <a href="https://ip.awk.sh/" rel = "nofollow" target = "_blank" title = "IPinfo">IP Query</a>
</nav>
<!-- Navigation Bar END -->
The display effect is shown below:
Adding Full-Text Search
You need to load the search plugin separately, include the relevant .js file, and enable the search function:
window.$docsify = {
	// Search settings
    search: {
       maxAge: 86400000, // Expiration time in milliseconds, default is one day
       paths: 'auto', // or 'auto'
       placeholder: 'Search',

       noData: 'No results found',

       // Maximum depth of search titles, 1 - 6
       depth: 3
    }
}
<script src="//unpkg.com/docsify"></script>
<script src="//unpkg.com/docsify/lib/plugins/search.js"></script>
Solving Slow Google Font Loading
Docsify offers various theme styles, but it was observed that each theme loads fonts from Google Fonts, causing slow speeds.

You can download the CSS locally and replace fonts.googleapis.com with fonts.loli.net.
Other Notes
Docsify offers far more than just these features, such as code highlighting, footers, and sidebars. For further configuration, refer to the official documentation: https://docsify.js.org/#/zh-cn/.
Summary
Before encountering Docsify, xiaoz had tried several documentation management systems, such as Wikitten and MinDoc mentioned in previous blog posts. In terms of user experience, Docsify is purely static, easy to deploy, and produces the most beautiful rendered pages. While MinDoc is more convenient for management, users can choose based on their actual needs. Currently, xiaoz doc has replaced MinDoc with Docsify.
- Docsify Demo: https://doc.xiaoz.org/#/
- Docsify Chinese Documentation: https://docsify.js.org/#/zh-cn/
- Docsify Project Address: https://github.com/docsifyjs/docsify/