How to Upgrade Kernel and Enable BBR on Linode CentOS 7
Linode has launched a $5 plan (1 Core, 1GB RAM) with excellent cost-performance ratio. If you need it, please click here [Linode launches $5 plan, new users get $20 free]. If used for running Shadowsocks, the speed might still be insufficient, but luckily there is Google BBR, a high-tech solution.

In a previous article [CentOS one-click kernel upgrade and Google BBR enablement], I shared a one-click script by Qiushui Yibing, but found that Linode VPS cannot upgrade the kernel via the script because Linode's kernel is modified by the official team. The correct approach is to install GRUB2 first, then upgrade the kernel. Here is the implementation method.
Install kernel 4.9 provided by elrepo
Add the elrepo source. Copy the code below into the SSH terminal and press Enter.
cat > /etc/yum.repos.d/elrepo.repo << EOF
[elrepo-kernel]
name=ELRepo.org Community Enterprise Linux Kernel Repository - el7
baseurl=http://elrepo.org/linux/kernel/el7/$basearch/
        http://mirrors.coreix.net/elrepo/kernel/el7/$basearch/
        http://jur-linux.org/download/elrepo/kernel/el7/$basearch/
        http://repos.lax-noc.com/elrepo/kernel/el7/$basearch/
        http://mirror.ventraip.net.au/elrepo/kernel/el7/$basearch/
enabled=1
gpgcheck=0
EOF
Next, install elrepo to replace the 4.9 kernel and grub2. Copy the command: yum -y install kernel-ml grub2 and execute it. Then run ls -l /boot/vmlinuz* to check if the kernel installation was successful.
Replace CentOS 7 kernel
Copy and execute the commands below:
[root@linode1495332 etc]# mkdir /boot/grub
[root@linode1495332 etc]# grub2-mkconfig -o /boot/grub/grub.cfg
Generating grub configuration file ...
Found linux image: /boot/vmlinuz-4.9.0-1.el7.elrepo.x86_64
Found initrd image: /boot/initramfs-4.9.0-1.el7.elrepo.x86_64.img
Found linux image: /boot/vmlinuz-0-rescue-72863e389b584a4dab36fae7f3bffda2
Found initrd image: /boot/initramfs-0-rescue-72863e389b584a4dab36fae7f3bffda2.img
done
Modify kernel boot method
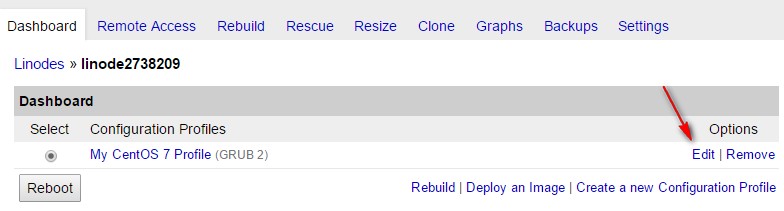
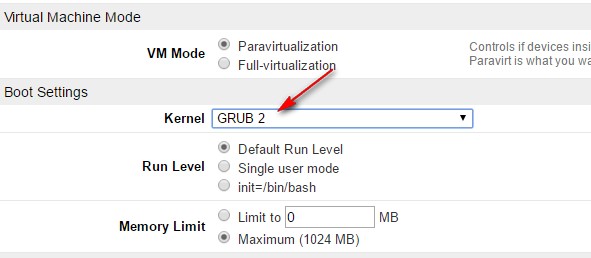
Next, go to the Linode Dashboard - Edit, and select the boot method as GRUB 2, as shown in the screenshot below.
Then reboot the server or restart it via the Linode dashboard panel. Log in to the server again and run uname -r to check the kernel version. If it shows > 4.9, the upgrade was successful.
[root@li1571-47 ~]# uname -r
4.9.10-1.el7.elrepo.x86_64
[root@li1571-47 ~]#
Enable Google BBR
Execute the commands below to add to the configuration file:
cat >>/etc/sysctl.conf << EOF
net.core.default_qdisc=fq
net.ipv4.tcp_congestion_control=bbr
EOF
Then run sysctl -p to make the configuration file take effect. BBR is now enabled. You can use the following methods to verify:
[root@linode1495332 ~]# sysctl net.ipv4.tcp_available_congestion_control
net.ipv4.tcp_available_congestion_control = bbr cubic reno
[root@linode1495332 ~]# lsmod | grep bbr
tcp_bbr                16384  70
Linode referral registration: [Linode registration], and enter the promo code: podcastinit2017 to get $20. This article references: [Linode CentOS7 enable Google TCP-BBR optimization algorithm]