WinSetupFromUSB - Multi-System USB Boot Tool
Publish: 2016-05-08 | Modify: 2016-05-08
Most of the time, reinstalling the system involves writing a PE to a USB flash drive, finding a ghost system online, and then installing it with a one-click method. This method is convenient, but it may have great risks. Nowadays, PE tools like LaoMaoTao and DaBaiCai often come bundled with software and perform actions such as locking the homepage. Additionally, third-party ghost systems usually contain a lot of promotional software. A better approach is to download the original image from the official website and use methods like NT6 to install the system. However, recently I discovered a tool called WinSetupFromUSB that can create a multi-system bootable installation tool.
This tool allows you to write multiple images to a USB flash drive, including Windows, Linux, and PE systems. As long as your USB flash drive has enough capacity, this won't be a problem. By using this tool to write the official original system to the USB flash drive, you can ensure that the system is pure and not bundled with any third-party software. If you choose Windows system, I recommend downloading it from MSDN, 我告诉你.
一、Software Download
You can download the latest version from the official website: WinSetupFromUSB (www.winsetupfromusb.com), or visit this link: WinSetupFromUSB-1-6 to download it from Baidu Cloud and then extract it to a directory to open the software.
二、Instructions
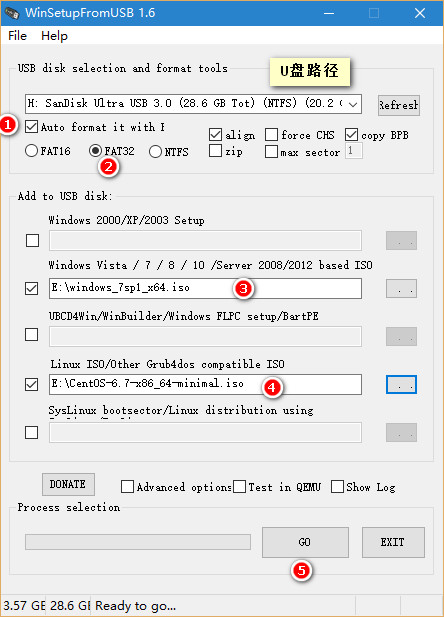
Prepare a USB flash drive (backup important data), the larger the capacity, the better. This software's advantage is that it can write multiple systems and boot them. Open the software and follow the screenshots below. Please refer to the instructions.

Circle 1: Check this option for the first use to automatically format the USB flash drive.
Circle 2: Select the format of the USB flash drive. If the image files are all smaller than 4GB, it is recommended to use FAT32. If your image is larger than 4GB, it is recommended to use NTFS (e.g. Windows 10 X64 and CentOS DVD version are both larger than 4GB).
Circle 3: Select the address of the Windows system image (in ISO format, recommended to download from MSDN, 我告诉你).
Circle 4: Select the Linux system image. Note: If it is a PE system, also select this option.
Circle 5: Start formatting and writing the boot method and image. Wait for it to finish.
Many users may ask, "Your screenshot only shows two systems being written. I want to write several systems such as PE/Windows/Linux, etc." Don't worry, after completing the above steps, you can repeat the process. However, when writing the image for the second time, make sure to uncheck Circle 1 (Auto format) above, otherwise it will be formatted again.
三、Deleting Boot Systems
If you have created a USB flash drive boot with four systems and want to delete one or more of them, you can find the complete method in the official FAQ: www.winsetupfromusb.com/faq/. Here is a simple translation and summary by Xiaoz Blog.
Windows Vista/7/8/10/Server 2008-2012
Delete the corresponding system directory under /WINSETUP/, and then use the tool BOOTICE to edit /boot/bcd and /efi/microsoft/boot/bcd to delete the unnecessary boot records.
Linux/Other Grub4dos compatible ISO
Delete the corresponding files under /ISO, and then use a text editor to edit the menu.lst file in the root directory and delete the following code:
title My Linux Iso
map –unmap=0:0xff
…
…
root (0xff)
chainloader (0xff)
四、Demonstration
After completing the above steps, set the USB flash drive as the boot device in the BIOS (you can search online for how to set the USB flash drive as the boot device in the BIOS). Finally, you will see the following screenshot options. Clicking on option 0 will display all your Windows system boots.

Comments

xiaoz
I come from China and I am a freelancer. I specialize in Linux operations, PHP, Golang, and front-end development. I have developed open-source projects such as Zdir, ImgURL, CCAA, and OneNav.
Random article
- Building a Visualized Scheduled Task with jiacrontab
- Deploying Simplenote with Docker for Web Access
- LNMP 1.2 Causes WordPress Frontend to Fail to Open
- Mapping SAMBA Shares as Network Drives in Windows 10
- Vultr: Get $50 Bonus for New User Registration, 16 Data Centers to Choose from, Hourly Billing
- Cloud Notes for Programmers - WizNote
- The Difference Between Nginx Reverse Proxy proxy_pass Target Address with and without /
- Compatibility Issue between Latest Version of Chrome Browser and Older Versions of jQuery
- Solution for CSS Loading Failure on DigitalOcean Official Website
- Register .club domain with Wanwang for only 1 yuan