How to Install WordPress on JD Cloud Engine (JAE) with One Click
JAE has recently been upgraded to support one-click WordPress installation, offering significant improvements and greater ease of use for beginners. However, the issue of temporary file loss has not yet been resolved, and we hope it will be addressed in the next update. To make the process clearer and simpler, here is a guide on how to use JAE to install WordPress with one click.
- First, log in to the JD Cloud Engine console (jae.jd.com). You will see the "One-Click Install Application" button on the right side.

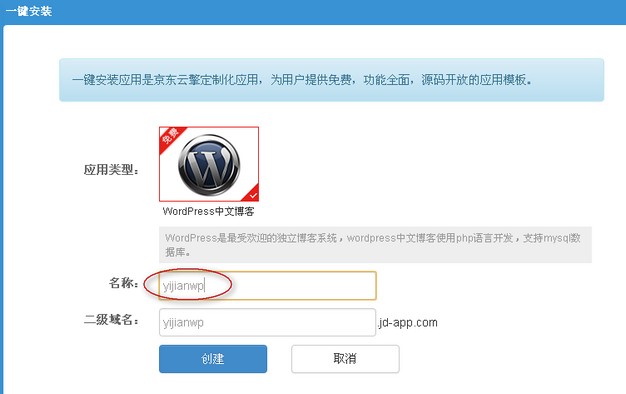
- Click the "One-Click Install Application" button, select the application type (currently only WordPress is supported), enter a name (this must be unique and will generate a subdomain), and then click "Create". See the screenshot below:
- Wait for the automatic deployment to complete. Once successful, a message will appear. Click "Visit Now" to proceed with site configuration.

- Proceed with the installation by entering site information, administrator password, email, etc.

- Installation is complete. You can now log in to the WordPress admin panel.

This update has simplified many steps, making it easier for beginners to set up their own blogs. However, some users have reported that the site becomes very slow after installation. This is because WordPress version 3.8 and later load fonts from Google. You can resolve this by blocking or replacing the font. For more details, see: Several Methods to Solve Slow Google Font Loading on WordPress Sites.
For a demo site, please visit the JAE Tutorial Network: http://xzblog.jd-app.com/
I have successfully installed themes and plugins online via JAE, and they remain intact after restarting the application. However, media attachments are lost upon restart, indicating that the temporary file issue has not yet been fixed. In the next article, I will share how to use the Qiniu Cloud Storage plugin to solve this problem. Stay tuned. If you encounter any issues during use, feel free to contact me via QQ: 337003006.